Sunday, 11 February 2018

A job for the weekend

My aim this weekend was to install all the electromagnets that will be used to uncouple wagons fitted with Sprat and Winkle couplings. It all started well marking the position of each electromagnet by drilling through the boards from above with a 1.5 mm drill. The hope is that the small holes, one of which that can just be seen in the picture below, will be easily filled so they're not too obvious and might be used as a position marker.


The thickness of the baseboard was then calculated and 5.5mm holes drilled from underneath to a depth just short of breaking through above ground. The only worry I had was, when the electromagnet was installed the ends of the poles would be approximately 5mm short from the bottom of the sleepers and might not be close enough to the rail hight to uncouple the wagons. As a test one electromagnet was installed on baseboard one and wiring attached through to the control panel.


Luckily when the circuit was activated I was able to uncouple the two test wagons on which I'd previously installed Sprat and Winkle couplings. Following this successful test four more electromagnets where duly installed in baseboard two.


Unfortunately at this point in the proceedings I ran out of wire... such progress only to be halted by the schoolboy error of lack of supplies. An order has been placed for more wire which will hopefully arrive in the next couple of days.

Thursday, 8 February 2018

The Old and the New

Normally I think the saying goes "out with the old and in with the new", but I thought I'd try my hand at combining the old with the new.

Again I've been thinking about what skills I lack and also what I've purchased to have a go at and not had the courage to start. I think it was at a Letterhead Scaleforum that, with all the bravado of a newbie to the hobby, I purchased a Craig Welsh etch for a 9ft RCH chassis. After a very poor attempt at constructing a Bill Bedford etch for a 16T mineral wagon Mr Welsh's etch was allowed to languish in a box along with a couple of wooden mineral wagon kits. In subsequent years I've been enticed to purchased some Rumney Models etches so I thought it was about time I had a go at constructing a chassis etch od some description.

When digging out the box containing Craig Welsh's etch I found this very old Ian Kirk kit.


God knows how long I've had this kit. Unlike Ian Kirk's later offerings for this type of wagon there is no internal planking detail on this vintage kit. Even so I thought if I make a good attempt at marrying this to Craig's etch it could be permanently loaded with coal to disguise the lake of internal detail.

So...

The body goes together reasonably well, though I think I may have to cut a new bottom for the wagon. I've already assigned the brake gear to the bin and the next task will be to remove the W irons and V hanger from the solebars.

As I'd spent a few moments (well more than a few) mulling over this little project, reading the build instructions for Craig's and also Rumney Models etches, that was as far as I got during last evenings visit to the "Man Cave".

Saturday, 27 January 2018

A white metal interlude

The other day I received an email from Missenden Abbey reminding me of the up and coming Spring Weekend that I've enrolled on. Of all the courses available, I'd chosen to attend the session on 4mm Locomotive Kit Construction. It was a tough decision as there were 4 other courses from which I could learn much: Weathering; Backscenes and scenery;Trackwork; also DCC Sound. In the end I realised that my skills in locomotive construction are currently my main weakness. Though I have had an 03 chassis built for me and have another area group member building a Beattie Well Tank chassis, I cannot rely on the good will of these guys for too long.

The decision I have to make is what to take to Missenden. My current options being:
  • A DJH 1366 kit - with the aim to get a working chassis by Sunday afternoon.
  • Another Beattie Well Tank - with the aim to get a working chassis by Sunday afternoon.
  • A 57xx Chassis as well as taking first attempt at a  57xx chassis for correction.
  • The white metal body kit of the Beattie Well Tank that the chassis is being built for.
In thinking about the last option it made me realise that I've not yet constructed a white metal kit. Would I really need to use my time at Missenden just to build a white metal locomotive body? Hmmm... That might not be getting the most out of the weekend.

So, to test my white metal soldering skills, I blew the dust off a couple of Four Most Models wagon kits. The first to get the heat treatment was a SR 12T 8 plank wagon.


Well, overall it's not turned out too bad. I don't think there is anything that a little filler cannot rectify. I'm not brave enough yet to apply more solder to fill some of the joints for fear I'll de-solder a joint. As a bonus the wheels are all in the same plain and it runs true with, so far, no derailments on Tredethy Wharf. I've not installed coupling hooks yet as I'm not sure if the white metal ones provided with the kit would be up to the task.

On to the next wagon, a  LSWR 10T round ended open.


I thought I'd compensate this wagon. Possibly no need to but had itching figures to use the MJT 2291 compensation units again.


After this brief trial of constructing these white metal kits my trepidation of tackling a white metal loco kits has lessened greatly. So this little interlude from the Brake Van Special has proven to me that my time at Missenden should be used mainly on one of the three chassis building projects not wholly on a white metal kit.

Sunday, 21 January 2018

Brake Van Special - Toad B

To add a little variation to the rake of brake vans for the Brake Van Special, I decided to dig out a Parkside's kit of a Toad B. I believe that some lasted into the 1960s in their original state so thought one might have found its way down to Cornwall. This is probably unlikely but as a Toad E was used on the Wenfordbridge Branch it might have happened...

When building plastic wagon kits I normally remove the plastic w irons complete with springs and axle boxes leaving just the wagon solebars. I then reduce the thickness of the solebars so that MJT W iron suppression units can be installed. Appropriate cast springs and axle boxes are then added to complete the running gear. In looking at the Toad B solebars I became aware of some very fragile components that, knowing me, would get damaged in the above procedure. This got me thinking of using MJT 2291 suspension units instead which would enable me to keep the Parkside offerings on the kit.


I believe the standard way to install these compensation units is to only use one rocking unit and insert bearings into the opposite end plastic axle boxes to create a fixed axle. In this instance, to make sure the ride height is parallel, I decided to install two units making one non rocking by slipping an appropriate thickness of plastic card between the mounting plate and the rocking assembly. The only other requirement was to create a groove in one set of the plastic axle boxes to allow one unit to rock.

 Other minor modifications I made to the kit are:
  • Replacing the plastic buffers with white metal ones supplied by Lanakshire Models.
  • Replacing the plastic torpedo vents in the roof with Lanakshire Models castings.
  • Installing three link couplings.


I've left the roof loose so that a few figures can be easily added to each veranda. The model's weight can then be checked and, if required, more weight can be added inside the van.

Next stage is making and fitting all the hand rails... Hmmm, this should be fun!

    Saturday, 20 January 2018

    BrakeVan Special - Figure painting

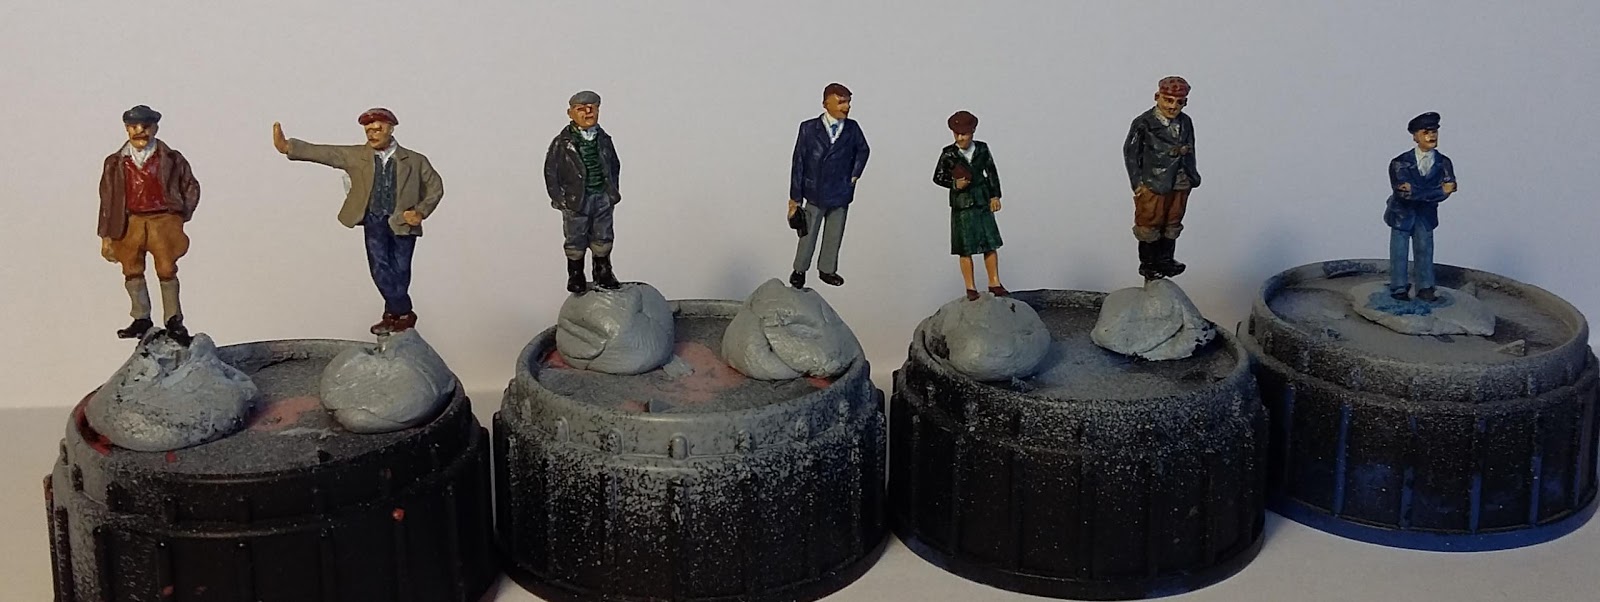
    Well painting the cattle and Pip got me started on figure painting but these are becoming a real task to paint...eventually I built up a small head of steam and completed the few below.


    Well, they still needing a little shading and a coat of matt varnish applying but they look to be a reasonable start. I have a number more to paint as the Brake Van Special will consist of about six vans. Unfortunately this is about the maximum number of brake vans my cassettes will take. I feel the vans should look crowded with people so I estimate I'll require around 40 or more figures. Hope I can keep the enthusiasm going and get a few more painted before Scaleforum...

    Saturday, 9 December 2017

    BR Class 03 at Tredethy Wharf

    A new addition:


    BR Class 03 where briefly used on the Wenford Branch when they replaced the WR 1366 locos and before Class 08s took over haulage along the branch.

    A couple of years ago I'd purchased a High Level Chassis kit along with Gibson wheels and all the bits to build a chassis for an 03. Though I'm being told that High Level kits go together very well, with instructions that are second to none, I still feel this kit might be a step too far for me at this moment in time. This is mainly due to the fact that I've not yet completing a simple 0-6-0 chassis successfully.  So, I was very pleased when one of our local area group (Clive Impey) offered to build the chassis for me. Clive embellished the kit with his preferred method of current collection which is  split axles.

    The loco requires renumbering along with some very light weathering to tone down the paint work of the Bachmann body, even so, I'm over the moon with this seeing this little loco running on Tredethy Wharf.

    Thanks Clive...

    Friday, 28 July 2017

    Web site update

    eBay sales have been going well, which has enabled me to fill in gaps of coaching stock requirements for my ambitious Grogley Junction. Oh, golf clubs have also been purchased.

    On the modelling front I've made a start on converting a couple of Class 08 shunters for Tredethy Wharf. These two will eventually be St Blazey engines but a little more research is involved as I'm realising that the differences between 08s is a potential minefield. Also on my workbench are four 7 plank wagons.


    Three of the above are Bachmann models which are receiving either a complete repaint and/or weathering. A fourth is a very old wagon of uncertain parentage which I've had for some time in a part-built state. My plan for the next few months is to try and clear as many part completed wagon projects as possible before starting on new builds or conversions. These part-built projects include a Cambrian LMS steel box van; a repainted Bachmann steel open wagon with wooden doors and a SR Plywood 12T van which I've also repainted; aalong with a couple of part-built Cambrian Models 16T mineral wagons. I'll then make a start on a few Brake Vans and people for the Brake Van Special. Once these are completed I hope to have cleared more "stuff" via eBay and created a reasonable hobby fund for making a start on Grogley Junction.

    The title of this post of "Web site update" is due to time also being spent updating my Tredethy Wharf Web pages. The updates have now been applied and the new pages are now live. If anyone is interested the site can be found at: http://tredethywharf.co.uk/